Updated Friday, October 9, 2015
This blog post assumes that you’ve never set up any kind of server environment on your system before and have no idea how to get started. It’s not the only way, but it’s an inclusive set of directions to follow. If you’ve already read the Craft Installation Docs, and were confused, then this post is for you.
- First you’ll want to install a program like MAMP (free version is sufficient) or XAMPP. These programs basically bundle install Apache, MySQL, and PHP on your system, and make it easy to access them with a GUI that gives you start and stop buttons.
- Start the MAMP installation and follow the steps. Choose “Install for all users of this computer”.
- To help you manage your MySQL databases, Sequel Pro will be installed in the process automatically. You’ll find the application in the MAMP folder.
- Start the MAMP App and choose the option “Launch MAMP” (not MAMP Pro!).
- During start-up process, choose “Allow incoming network connections”.
- Your browser should then show your local MAMP homepage. (If you click on “localhost” in the address field of your browser, you will see the complete address “localhost:8888/MAMP/?language=English”.) On the MAMP page in the left column you will find your login parameters to connect with a database.

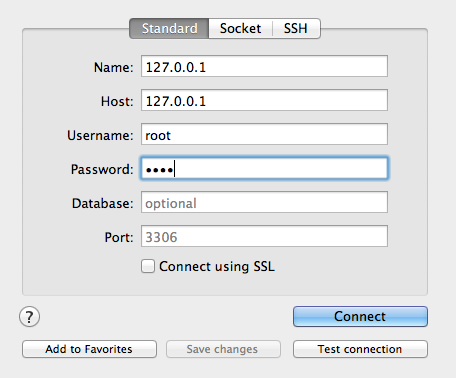
- Open Sequel Pro and use these parameters to open a connection. Your host should be “localhost” or “127.0.0.1” and your use name and password are probably both “root.”
- After hitting “Connect,” create a new database by clicking Database > Add Database, or option + shift + A. Name your database something that makes sense to your project. We’ll go with “myprojectbase”
- Go to buildwithcraft.com and download the latest version of Craft.
- Navigate to “applications/MAMP/htdocs” folder and create a folder “myproject” inside (or any other name, just don’t call it “Craft” to avoid confusion.) While it might not be necessary to set up a folder for your project, it’s nice to have one since local installs of Craft are free and you could set up another folder for another local Craft project and have things separated.

- In your unzipped Craft folder you’ll find the two folders “craft” and “public”. Move both into your project folder (“myproject”, if you follow our example.)
- Navigate to craft/config/db.php and open the db.php file in any text editor.
- Edit this file with your MySQL and database information. If you used MAMP, yours will look similar to this example, except maybe for the database name:
<?php return array( /** * The database server name or IP address. */ 'server' => '127.0.0.1', /** * The database username to connect with. */ 'user' => 'root', /** * The database password to connect with. */ 'password' => 'root', /** * The name of the database to select. */ 'database' => 'myprojectbase', /** * The prefix to use when naming tables. This can be no more than 5 characters. */ 'tablePrefix' => 'craft', ); - Rename your “htaccess” file to “.htaccess” (just add a “.” in front of it) and delete the web config file. This can be tricky, as your computer may complain. If it says that this is a reserved name, make sure to go to enable hidden files. To do this, open your Terminal and type in:
Restart finder and try to rename the file again.defaults write com.apple.Finder AppleShowAllFiles YES - At this point, if you followed those instructions directly, you should be able to go to localhost:8888/myproject/public/admin or 127.0.0.1:8888/myproject/public/admin in your web browser. This is how you will access the admin panel later.
- From here, press the big Install button and let Craft take you through the setup process.
- Your (public-facing) website should be accessible at localhost:8888/myproject/public or 127.0.0.1:8888/myproject/public/ Enter one of these urls during the Craft install

Read about my experience using Craft to build Proofessor HERE. That post will also show you how to get a little fancier and set up a virtual host. It also shows you the back end of how to actually use Craft.
Huge thank you to Wolfram Gehring for updating these docs!